


armbian安装Arm版本的Proxmox VE
要在Arm64平台上安装Proxmox VE,你应该需要装armbian。或者debian。
安装方法,如此文大体相同
假设你已经安装好了armbian或者debian,并开启了ssh
一:配置网络
由于某些debian使用的是nmcli,还需要停用NetworkManager服务
systemctl disable NetworkManager
systemctl stop NetworkManager
删除其他的文件
rm /etc/network/interfaces.d/*
编辑网卡配置文件
nano /etc/network/interfaces
添加如下参数
auto eth0
iface eth0 inet static
      #注意替换下面的mac地址。可以随意指定
      hwaddress ether 9E:61:9A:E4:CE:AA
      address 10.13.14.109/24
      gateway 10.13.14.254
请自觉将eth0换成自己的网卡(开发板一般是eth0,具体请自己查看)。把ip换成自己的ip(可以通过命令ip a 查看自己的网卡名)
如果没有回环接口,请添加一个回环接口
auto lo
iface lo inet loopback
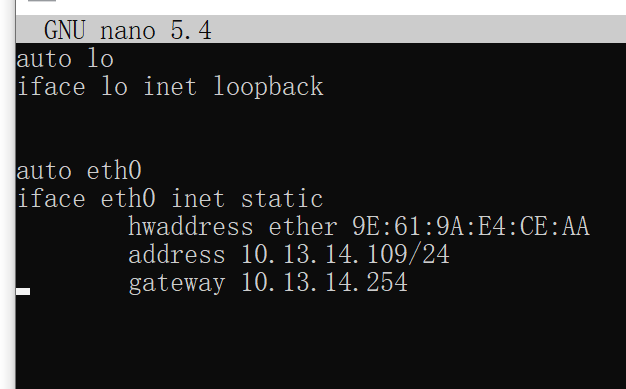
最终结果如下
配置dns
echo "nameserver 223.5.5.5" >>/etc/resolv.conf
重启网络服务
systemctl restart networking
如果这个命令报错,请重启一下机器。
二: 配置host
pve服务需要host文件正确,否则会出现无法启动的问题。
这是原本的host文件
127.0.0.1   localhost
127.0.1.1   armbian
::1         localhost armbian ip6-localhost ip6-loopback
fe00::0     ip6-localnet
ff00::0     ip6-mcastprefix
ff02::1     ip6-allnodes
ff02::2     ip6-allrouter
从上面的文件,可以看出主机hostname为armbian,这很关键。
我们将::1 这上面的部分改成如下:
127.0.0.1 localhost.localdomain localhost
10.13.14.109 armbian.pvetest.com armbian
10.13.14.109 armbian.pvetest.com armbian这段结构是ip fqdn hostname
fqdn就是域名全称。例如www.baidu.com。www则代表主机名,baidu.com是域名,fqdn是www.baidu.com
fqdn可以自己取,如果你不懂,你就按照我这个来填。但是你必须将debian换成自己的hostname。这个hostname将作为PVE的节点名称。
也请自己将ip换成自己的ip.
并且将::1后面的armbian字样删除
最后的hosts如下。也可以复制下面的host,替换fqdn和hostname即可
127.0.0.1   localhost
10.13.14.109 armbian.pvetest.com armbian

::1         localhost ip6-localhost ip6-loopback
fe00::0     ip6-localnet
ff00::0     ip6-mcastprefix
ff02::1     ip6-allnodes
ff02::2     ip6-allrouters
保存之后。建议重启机器。
三:修改源
需要将debian源换成国内源,否则会由于网络超时,无法安装软件包。
删除现在软件源
rm /etc/apt/sources.list
新建软件源
nano /etc/apt/sources.list 并将下面内容填进去
如果是pve7 debian11
deb https://mirrors.tuna.tsinghua.edu.cn/debian/ bullseye main contrib non-free
deb https://mirrors.tuna.tsinghua.edu.cn/debian/ bullseye-updates main contrib non-free
deb https://mirrors.tuna.tsinghua.edu.cn/debian/ bullseye-backports main contrib non-free
deb https://mirrors.tuna.tsinghua.edu.cn/debian-security bullseye-security main contrib non-free
如果是pve8 debian12
deb https://mirrors.tuna.tsinghua.edu.cn/debian/ bookworm main contrib non-free
deb https://mirrors.tuna.tsinghua.edu.cn/debian/ bookworm-updates main contrib non-free
deb https://mirrors.tuna.tsinghua.edu.cn/debian/ bookworm-backports main contrib non-free
deb https://mirrors.tuna.tsinghua.edu.cn/debian-security bookworm-security main contrib non-free
最后按ctrl +x 保存
可以执行下面命令验证
cat /etc/apt/sources.list
如下面图片即可。

添加源
如果是安装pve8,且版本为bookworm,则添加如下源
echo "deb https://mirrors.apqa.cn/proxmox/debian/pve bookworm port">/etc/apt/sources.list.d/pveport.list
如果是安装pve7,且版本为bullseye,则添加如下源
echo "deb https://mirrors.apqa.cn/proxmox/debian/pve bullseye port">/etc/apt/sources.list.d/pveport.list
添加apt-key
curl https://mirrors.apqa.cn/proxmox/debian/pveport.gpg -o /etc/apt/trusted.gpg.d/pveport.gpg
四:安装Proxmox VE
使用正确的path
export PATH=/usr/local/sbin:/usr/local/bin:/usr/sbin:/usr/bin:/sbin:/bin
安装Proxmox VE
apt update && apt install -y proxmox-ve
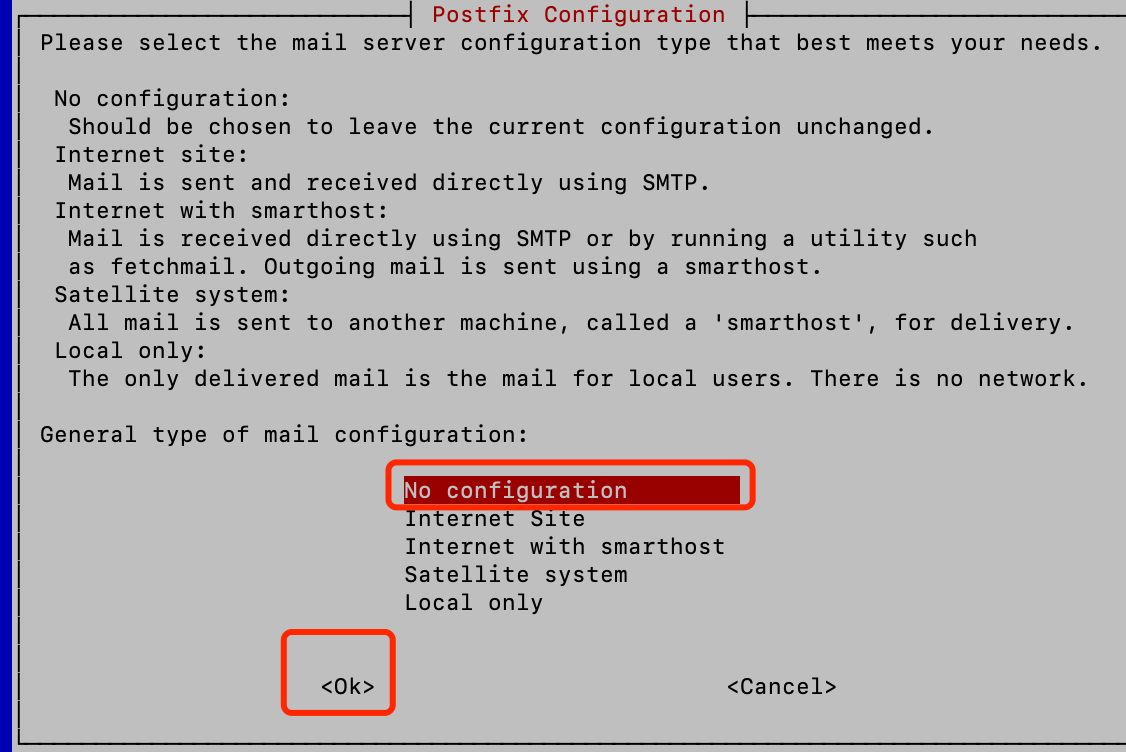
会出现一个弹窗,请按下面的标记选择
等上一段时间,安装结束之后,就可以访问pve。
五:异构核心---升级至7.2-15之后,可以在web上手动绑核,PVE官方已经支持绑核
kvm目前不自适应异构核心CPU,例如RK3399,属于4小核,2大核组成的6核。
当KVM在初始化虚拟机的时候,不知道给虚拟机哪个线程。会出现下面报错
kvm: kvm_init_vcpu: kvm_arch_init_vcpu failed (0): Invalid argument
所以当你的CPU是异构的情况时,你必须在虚拟机启动的时候,手动绑定线程。
如下:
#将虚拟机配置导出为kvm命令
qm showcmd 100 >100.cmd
#添加指定权限
chmod +x 100.cmd
#手动绑定0-3cpu到这个虚拟机
taskset -c 0-3 100.cmd
当然,可以修改PVE底层代码,完成自动化。
编辑/usr/share/perl5/PVE/QemuServer.pm 文件
在下面位置添加#号之间的内容,可以通过搜索kvm_binary; 快速定位
   my $use_old_bios_files = undef;
    ($use_old_bios_files, $machine_type) = qemu_use_old_bios_files($machine_type);
#添加
    if (defined($conf->{cpu_taskset})) {
        push @$cmd, 'taskset', '-c', $conf->{cpu_taskset};
    }
##

    push @$cmd, $kvm_binary;
在下面位置添加#号内容,可以通过搜索$cicustom_fmt 快速定位。
    meta => {
        type => 'string',
        format => $meta_info_fmt,
        description => "Some (read-only) meta-information about this guest.",
        optional => 1,
    },
#######################
     cpu_taskset => {
        optional => 1,
        type => 'string',
        description => "CPU pinning config.",
        verbose_description => "When specified VM will be launched with `cpuset -c {cpu_taskset} kvm ...`\n"
            ."No argument test is performed so please make sure the value matches VM cpu total thread count.\n"
            ."This is required when VM is sensitive to host context switching (e.g. gaming),"
            ." or when host is not SMP so VM thread could be switched to a different CPU architecture (e.g. big.LITTLE for ARM).",
    },
#################################
};

my $cicustom_fmt = {
    meta => {
        type => 'string',
        optional => 1,
展开
修改完成之后,重启pve服务
systemctl restart pvedaemon
如果出错,请还原。
cp /usr/share/perl5/PVE/QemuServer.pm.back /usr/share/perl5/PVE/QemuServer.pm
并重启服务
systemctl restart pvedaemon
修改代码之后,请在虚拟机配置文件中,添加一个参数
cpu_taskset: 0-3
此代码意思为绑定虚拟机到0-3CPU上。注意!请不要使用2个不同类型的核心,如大核和小核混用。
绑定到1,3上
cpu_taskset: 1,3
此写法,和taskset命令规范一致。
六:虚拟机配置
需要注意一些CPU配置
下面为必须遵守的配置规则。
CPU:host或者max
BIOS:OVMF
OSYPE: l26
机器:i440fx
磁盘:SCSI
磁盘控制器:Virtio-Scsi(非single)
光驱:SCSI
需要注意,虚拟机需要有EFI ACPI支持,才能启动。
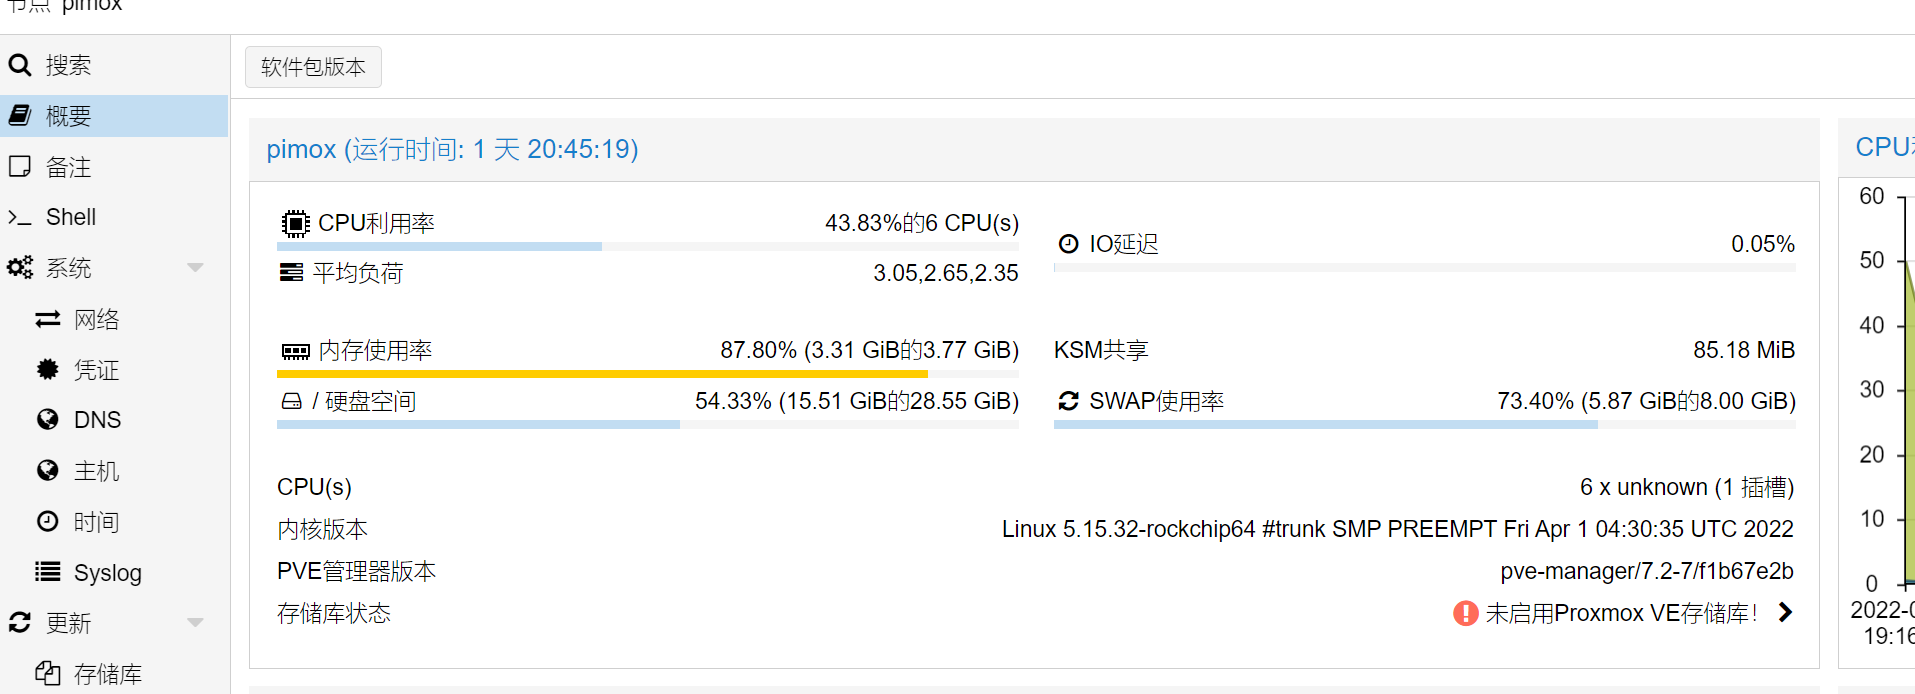
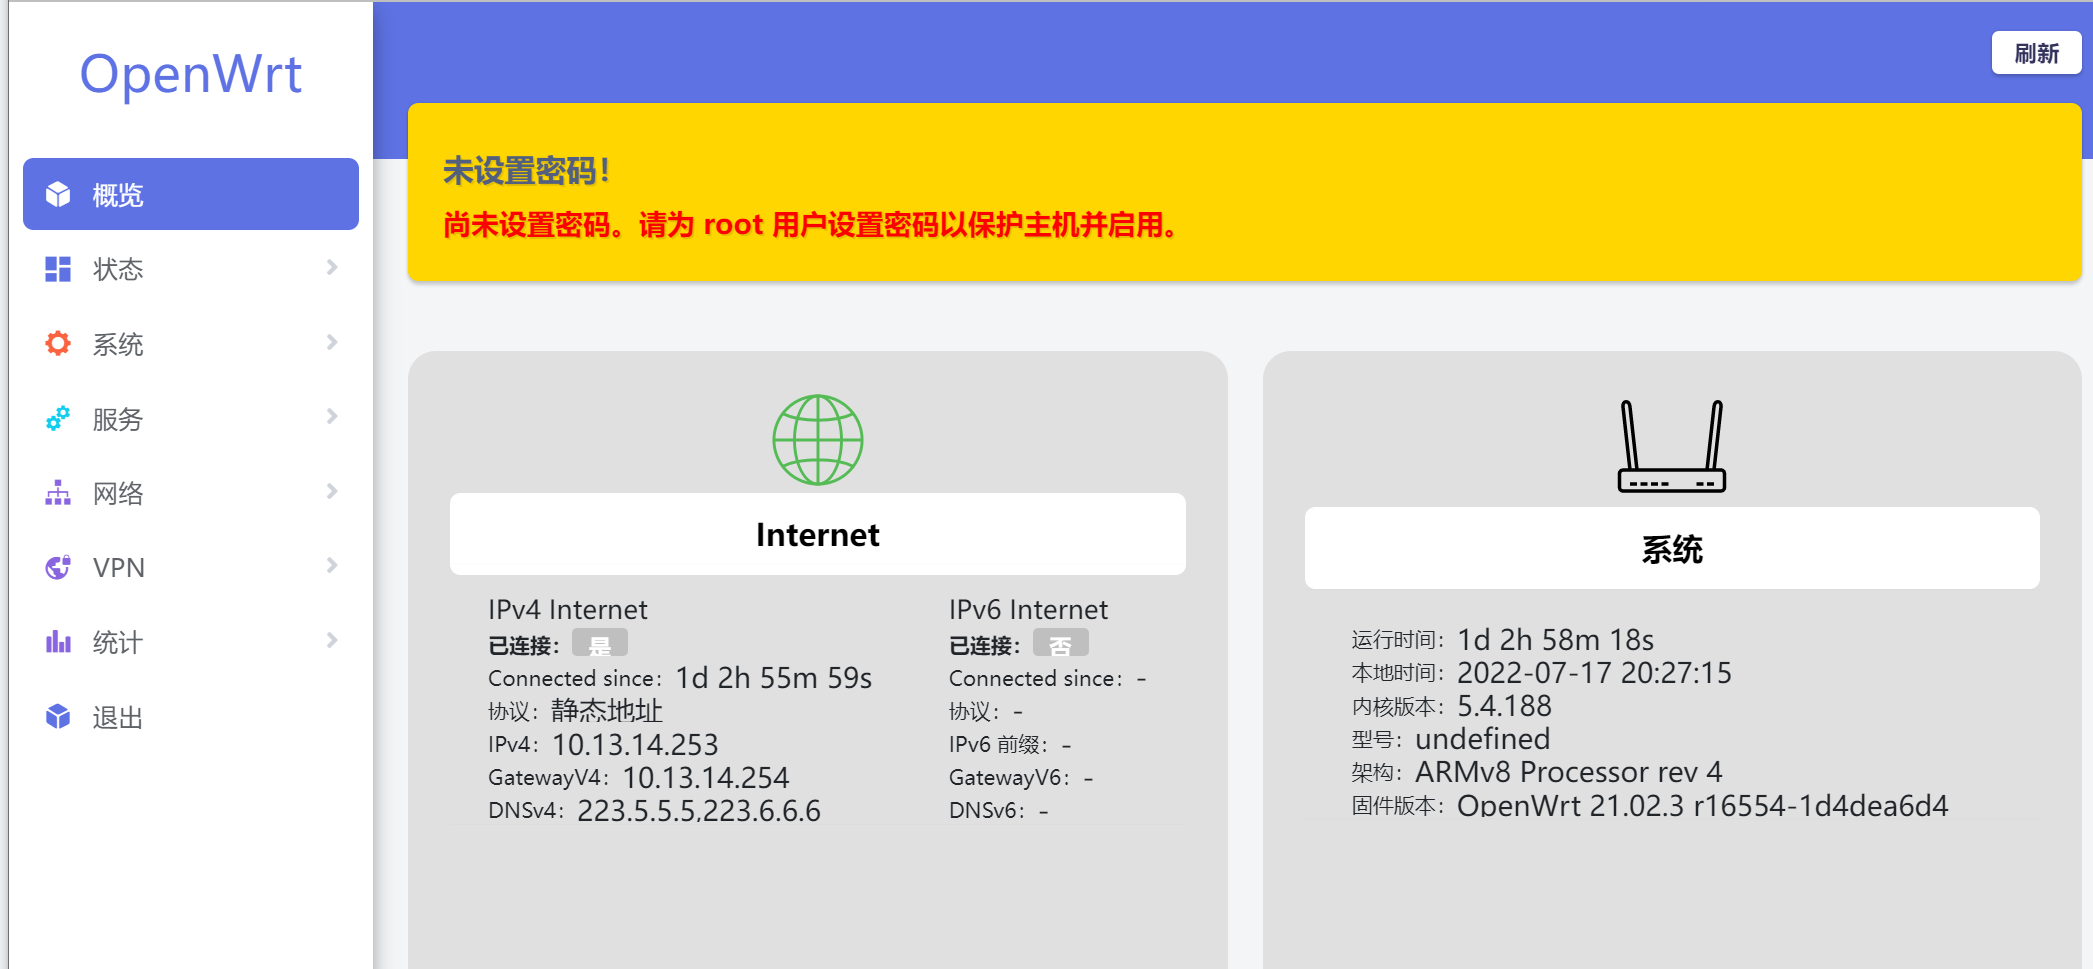
七:截图
八:安装Proxmox-Backup-Server pbs
添加源
echo "deb https://foxi.buduanwang.vip/pan/foxi/Virtualization/proxmox/foxi/ pbsarm main">/etc/apt/sources.list.d/foxipbs.list
添加apt-key
curl -L https://foxi.buduanwang.vip/pan/foxi/Virtualization/proxmox/foxi/gpg.key |apt-key add
安装pbs
apt update && apt install proxmox-backup-server -y
注意,安装pbs请参考第一、二配置好系统。也请不要在pve上安装pbs
九:低内存优化
减少worker数量
默认的workers是3,可以修改下面PVE/Service对应的文件,最低worker为1
root@arm1:/usr/share/perl5/PVE/Service# grep 'max_workers => 3' *
pvedaemon.pm:    max_workers => 3,
pveproxy.pm:    max_workers => 3,
spiceproxy.pm:    max_workers => 3, # todo: do we need more?
停用HA服务
集群可以使用HA服务,如果是单节点,或者没有HA场景,可以禁用
systemctl stop pve-ha-lrm.service
systemctl stop pve-ha-crm.service
systemctl disable pve-ha-lrm.service
systemctl disable pve-ha-crm.service
停用防火墙服务
systemctl disable pve-firewall.service
systemctl stop pve-firewall.service
停用调度服务,如果不需要计划任务,如备份。
systemctl stop pvescheduler.service
systemctl disable pvescheduler.service
停用Spiceproxy
Arm版本就不支持Spice,可以停用
systemctl stop spiceproxy.service
systemctl disable spiceproxy.service
以上可以减少400M内存左右。
十:Armbain系统优化
禁用zram
systemctl disable armbian-zram-config.service
systemctl disable armbian-ramlog.service