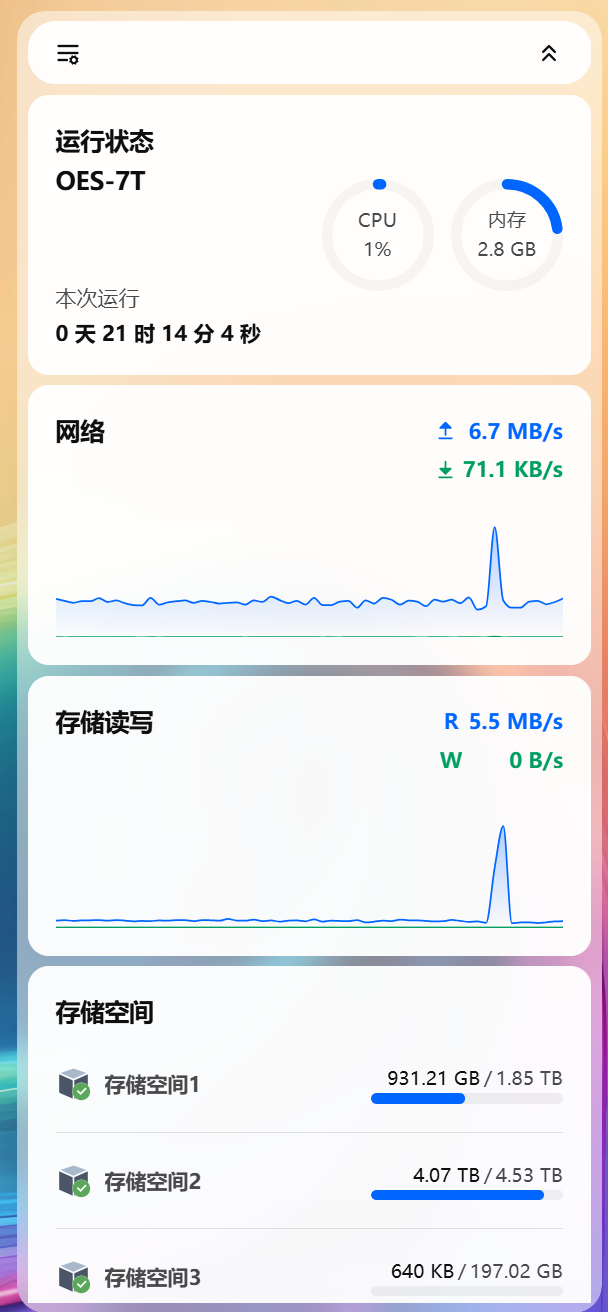
arm机器还是oes矿渣适合做个轻nas 4G RAM +256G emmc + 3*SATA
刷机很简单 和armbian差不多都是要写镜像到U盘插入启动 然后 然后看路由debian的ip 浏览器访问 然后设置账号密码
在ssh登录
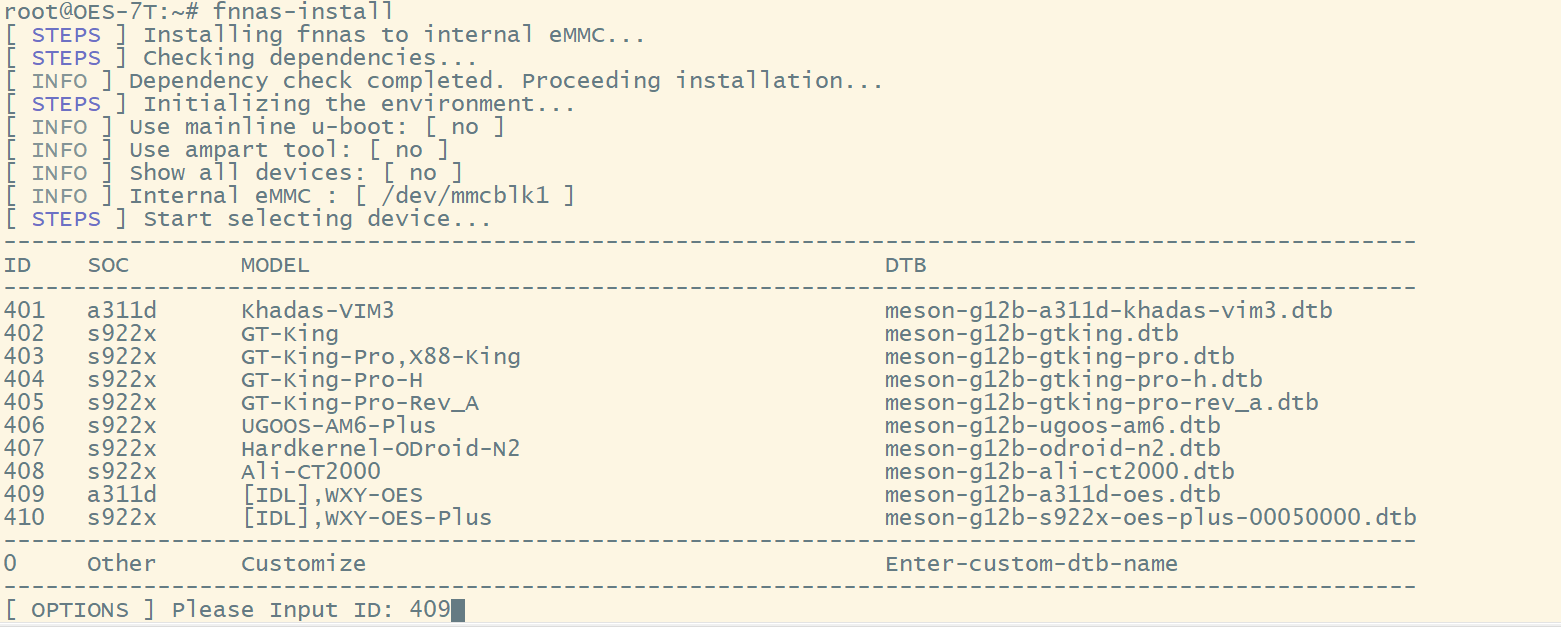
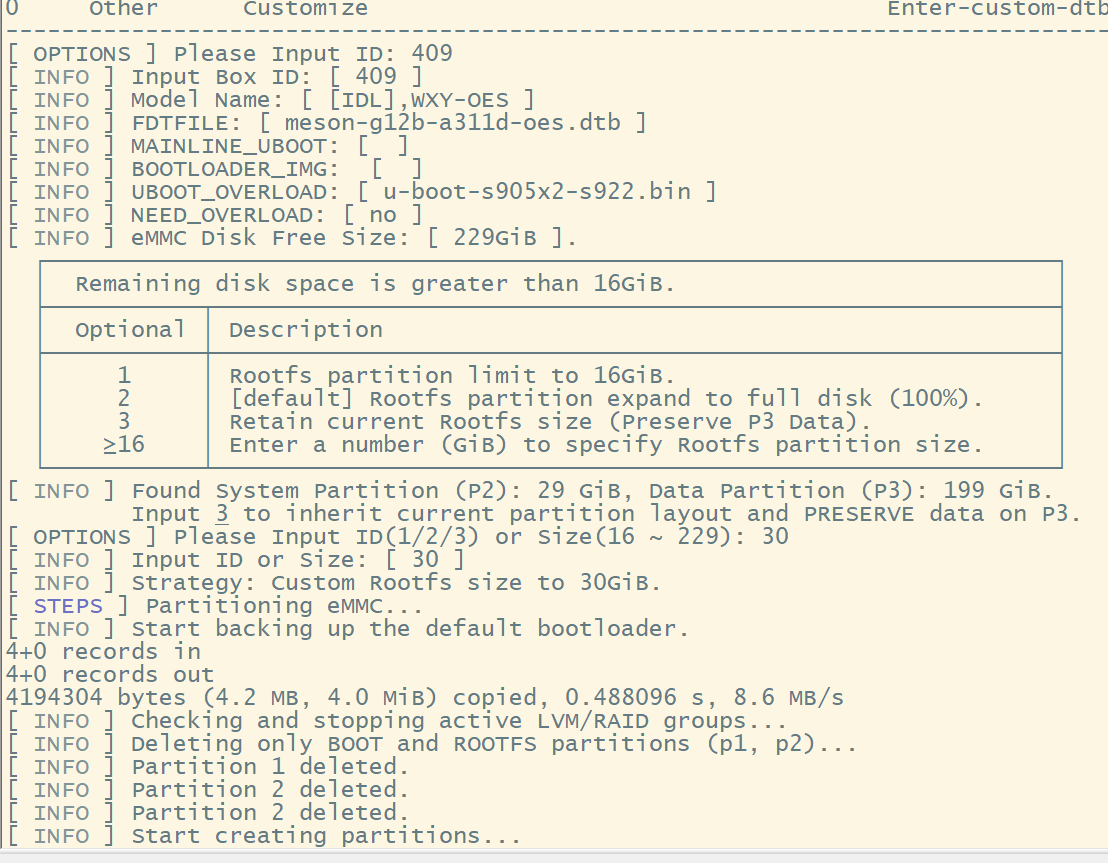
根据机型选,现在最新版支持输入系统分区了 没扩容的直接默认,我是256G 给它30G 已经够够的了
刷机过程的代码
root@OES-7T:~# fnnas-install
[ STEPS ] Installing fnnas to internal eMMC...
[ STEPS ] Checking dependencies...
[ INFO ] Dependency check completed. Proceeding installation...
[ STEPS ] Initializing the environment...
[ INFO ] Use mainline u-boot: [ no ]
[ INFO ] Use ampart tool: [ no ]
[ INFO ] Show all devices: [ no ]
[ INFO ] Internal eMMC : [ /dev/mmcblk1 ]
[ STEPS ] Start selecting device...
-----------------------------------------------------------------------------------------------------
ID SOC MODEL DTB
-----------------------------------------------------------------------------------------------------
401 a311d Khadas-VIM3 meson-g12b-a311d-khadas-vim3.dtb
402 s922x GT-King meson-g12b-gtking.dtb
403 s922x GT-King-Pro,X88-King meson-g12b-gtking-pro.dtb
404 s922x GT-King-Pro-H meson-g12b-gtking-pro-h.dtb
405 s922x GT-King-Pro-Rev_A meson-g12b-gtking-pro-rev_a.dtb
406 s922x UGOOS-AM6-Plus meson-g12b-ugoos-am6.dtb
407 s922x Hardkernel-ODroid-N2 meson-g12b-odroid-n2.dtb
408 s922x Ali-CT2000 meson-g12b-ali-ct2000.dtb
409 a311d [IDL],WXY-OES meson-g12b-a311d-oes.dtb
410 s922x [IDL],WXY-OES-Plus meson-g12b-s922x-oes-plus-00050000.dtb
-----------------------------------------------------------------------------------------------------
0 Other Customize Enter-custom-dtb-name
-----------------------------------------------------------------------------------------------------
[ OPTIONS ] Please Input ID: 409
[ INFO ] Input Box ID: [ 409 ]
[ INFO ] Model Name: [ [IDL],WXY-OES ]
[ INFO ] FDTFILE: [ meson-g12b-a311d-oes.dtb ]
[ INFO ] MAINLINE_UBOOT: [ ]
[ INFO ] BOOTLOADER_IMG: [ ]
[ INFO ] UBOOT_OVERLOAD: [ u-boot-s905x2-s922.bin ]
[ INFO ] NEED_OVERLOAD: [ no ]
[ INFO ] eMMC Disk Free Size: [ 229GiB ].
┌────────────────────────────────────────────────────────────────────────┐
│ Remaining disk space is greater than 16GiB. │
├───────────┬────────────────────────────────────────────────────────────┤
│ Optional │ Description │
├───────────┼────────────────────────────────────────────────────────────┤
│ 1 │ Rootfs partition limit to 16GiB. │
│ 2 │ [default] Rootfs partition expand to full disk (100%). │
│ 3 │ Retain current Rootfs size (Preserve P3 Data). │
│ ≥16 │ Enter a number (GiB) to specify Rootfs partition size. │
└───────────┴────────────────────────────────────────────────────────────┘
[ INFO ] Found System Partition (P2): 29 GiB, Data Partition (P3): 199 GiB.
Input 3 to inherit current partition layout and PRESERVE data on P3.
[ OPTIONS ] Please Input ID(1/2/3) or Size(16 ~ 229): 30
[ INFO ] Input ID or Size: [ 30 ]
[ INFO ] Strategy: Custom Rootfs size to 30GiB.
[ STEPS ] Partitioning eMMC...
[ INFO ] Start backing up the default bootloader.
4+0 records in
4+0 records out
4194304 bytes (4.2 MB, 4.0 MiB) copied, 0.488096 s, 8.6 MB/s
[ INFO ] Checking and stopping active LVM/RAID groups...
[ INFO ] Deleting only BOOT and ROOTFS partitions (p1, p2)...
[ INFO ] Partition 1 deleted.
[ INFO ] Partition 2 deleted.
[ INFO ] Start creating partitions...
[ INFO ] Partition table exists. Trying to preserve partition 3+...
[ INFO ] Creating BOOTFS partition...
[ INFO ] Creating Rootfs partition...
[ INFO ] Overlap detected. Invoking Nuclear Re-partition to apply new size...
[ INFO ] Re-initializing partition table (Nuclear Option)...
[ INFO ] 03. Write the mybox bootloader: [ /usr/lib/u-boot/mybox-bootloader.img ]
444+0 records in
444+0 records out
444 bytes copied, 0.00996364 s, 44.6 kB/s
8191+0 records in
8191+0 records out
4193792 bytes (4.2 MB, 4.0 MiB) copied, 0.548675 s, 7.6 MB/s
[ STEPS ] Processing BOOTFS partition...
[ INFO ] Formatting BOOTFS partition...
mkfs.fat 4.2 (2021-01-31)
mount: (hint) your fstab has been modified, but systemd still uses
the old version; use 'systemctl daemon-reload' to reload.
[ INFO ] Copying BOOTFS ...
[ INFO ] Update the [ uEnv.txt ] file.
[ STEPS ] Start processing the rootfs partition...
[ INFO ] Formatting ROOTFS ...
btrfs-progs v6.2
See http://btrfs.wiki.kernel.org for more information.
Performing full device TRIM /dev/mmcblk1p2 (30.00GiB) ...
NOTE: several default settings have changed in version 5.15, please make sure
this does not affect your deployments:
- DUP for metadata (-m dup)
- enabled no-holes (-O no-holes)
- enabled free-space-tree (-R free-space-tree)
Label: ROOTFS_EMMC
UUID: 4aec3cb0-e2e1-43ec-98e2-d5da833f6771
Node size: 16384
Sector size: 4096
Filesystem size: 30.00GiB
Block group profiles:
Data: single 8.00MiB
Metadata: single 8.00MiB
System: single 4.00MiB
SSD detected: yes
Zoned device: no
Incompat features: extref, skinny-metadata, no-holes
Runtime features: free-space-tree
Checksum: crc32c
Number of devices: 1
Devices:
ID SIZE PATH
1 30.00GiB /dev/mmcblk1p2
mount: (hint) your fstab has been modified, but systemd still uses
the old version; use 'systemctl daemon-reload' to reload.
[ INFO ] Copying ROOTFS ...
[ INFO ] Copying [ etc ] ...
[ INFO ] Copying [ home ] ...
[ INFO ] Copying [ opt ] ...
[ INFO ] Copying [ root ] ...
[ INFO ] Copying [ srv ] ...
[ INFO ] Copying [ usr ] ...
[ INFO ] Copying [ var ] ...
tar: var/lib/samba/winbindd_privileged/pipe: socket ignored
[ INFO ] Generate the new fstab file.
[ INFO ] Update parameters related to the releases file.
[ INFO ] Update parameters related to the fnnas configuration file.
[ SUCCESS ] Installation successful. Run [ poweroff ], remove the installation media then re-insert the power supply to boot new system.
root@OES-7T:~#
我这里装了2块ssd 1T在机内,一块5T的 移动硬盘 拆掉了外壳,直接接sata但是太厚了 只能引线出来放外面。。。
2026.02.26 fnnas 最新的 包已经支持npu
root@fnnas:~# ls -l /dev/dri/
total 0
drwxr-xr-x 2 root root 120 Jun 26 2025 by-path
crw-rw---- 1 root video 226, 0 Jun 26 2025 card0
crw-rw---- 1 root video 226, 1 Jun 26 2025 card1
crw-rw---- 1 root render 226, 128 Jun 26 2025 renderD128
crw-rw---- 1 root render 226, 129 Jun 26 2025 renderD129
root@fnnas:~# lsmod | grep mali
root@fnnas:~# dmesg | grep -i "mali\|gpu"
[ 14.180914] etnaviv etnaviv: bound ff100000.npu (ops gpu_ops [etnaviv])
[ 14.181082] etnaviv-gpu ff100000.npu: model: GC8000, revision: 7120
[ 14.181102] etnaviv-gpu ff100000.npu: etnaviv has been instantiated on a NPU, for which the UAPI is still experimental
[ 14.345841] panfrost ffe40000.gpu: clock rate = 24000000
[ 14.345898] panfrost ffe40000.gpu: error -ENODEV: oppset_regulators: no regulator (mali) found
[ 14.354006] panfrost ffe40000.gpu: mali-g52 id 0x7212 major 0x0 minor 0x0 status 0x0
[ 14.354033] panfrost ffe40000.gpu: features: 00000000,00000df7, issues: 00000000,00000400
[ 14.354040] panfrost ffe40000.gpu: Features: L2:0x07110206 Shader:0x00000000 Tiler:0x00000809 Mem:0x1 MMU:0x00002830 AS:0xff JS:0x7
[ 14.354049] panfrost ffe40000.gpu: shader_present=0x3 l2_present=0x1
[ 14.364836] [drm] Initialized panfrost 1.4.0 for ffe40000.gpu on minor 1
不过在oes上好像报错些信息 但起码 来了! 应该不久能用上了